Como usar um display LCD 16×2 I2C na Raspberry Pi Pico
A Raspberry Pi Pico é uma placa muito versátil, que conta com vários tipos de interface como I2C, UART e SPI, além de possuir conversor analógico digital (ADC) de 12 bits e portas PWM. Hoje vamos usar a interface I2C e conectar um display LCD 16×2 I2C na Raspberry Pi Pico, programando-a usando MicroPython.
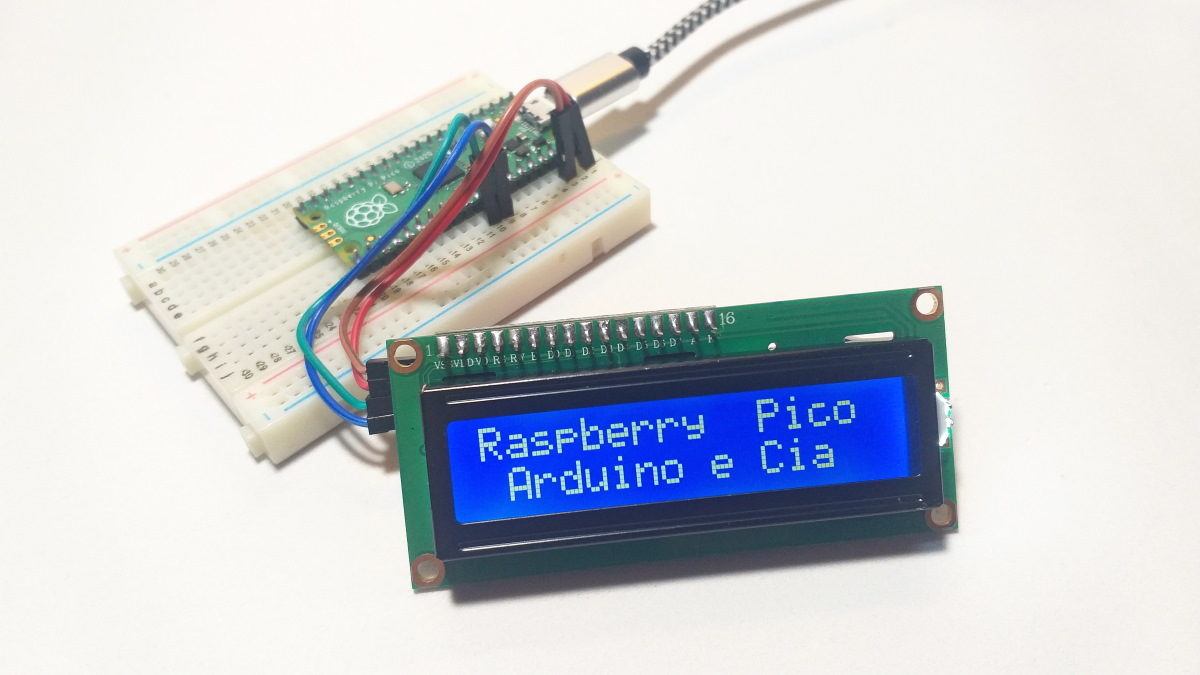
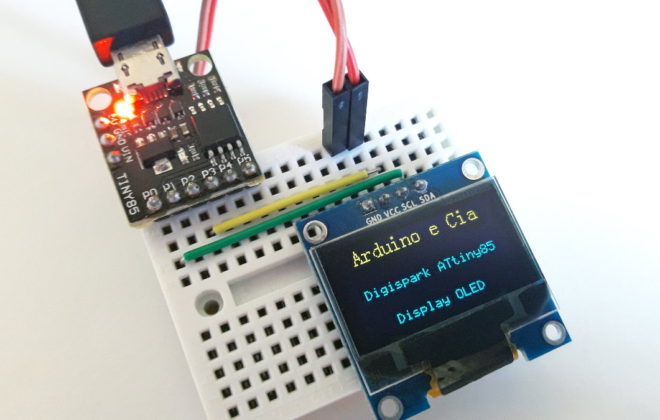
O display LCD 16×2 I2C Backlight Azul que usaremos nos testes já é um velho conhecido aqui no blog, e com ele você tem 16 colunas e 2 linhas para apresentar textos e (alguns) gráficos, mostrando informações como temperatura, horário, avisos, etc. A interface I2C de apenas dois pinos permite uma fácil conexão com as mais variadas placas e microcontroladores existentes no mercado.
Conexão do display LCD 16×2 I2C na Raspberry Pi Pico
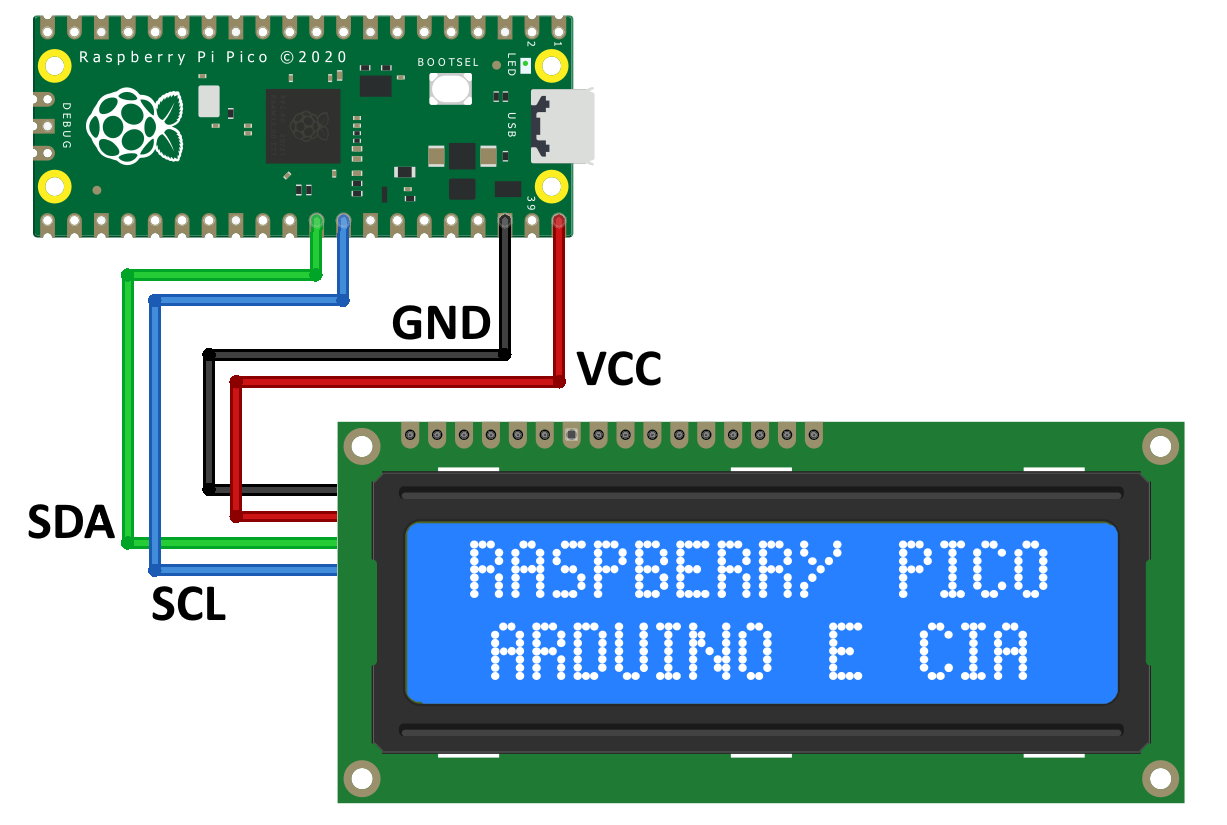
Assim como no Arduino, a instalação do display LCD 16×2 I2C na Raspberry Pi Pico é muito simples, usando apenas os dois pinos de controle da interface I2C (SDA e SCL) e dois pinos para alimentação do display.
O display LCD que estamos usando funciona com tensão de 5V, logo vamos obter essa tensão conectando o pino VCC do display no pino 40 (VBUS) da Pico.
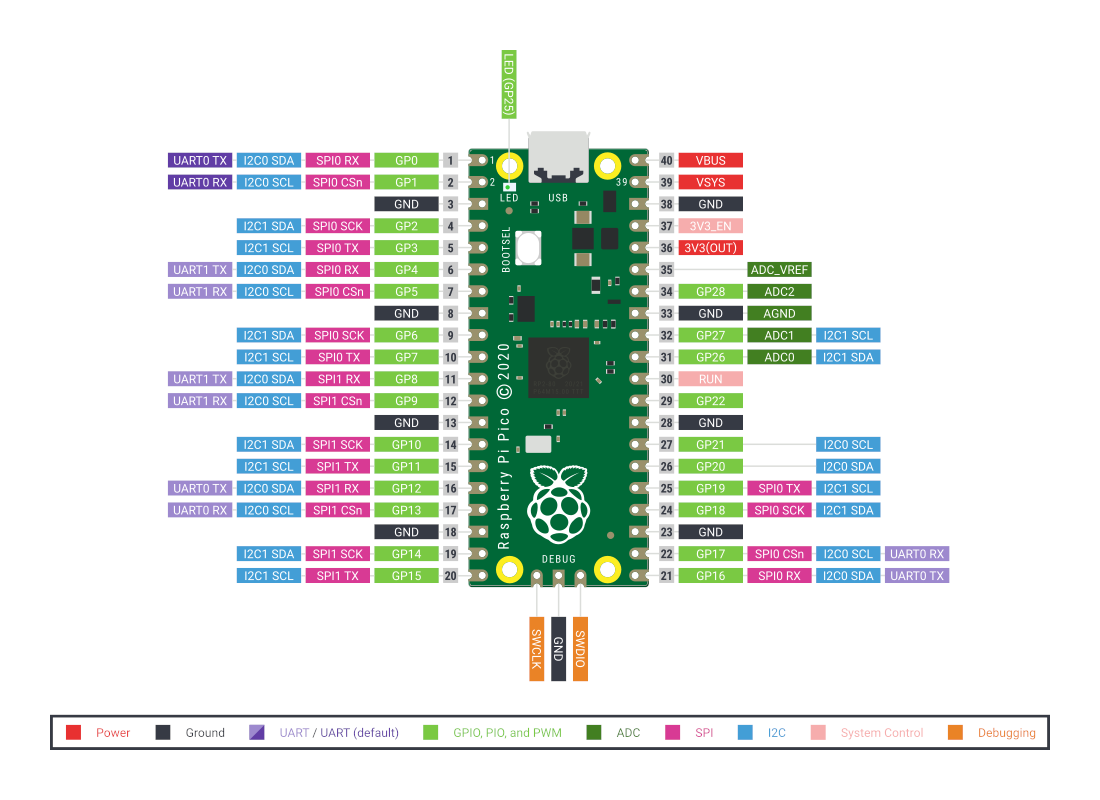
A Raspberry Pi Pico possui vários pinos que funcionam com a interface I2C, e optamos por usar os pinos 31 (GP26 – SDA) e 32 (GP27 – SCL). Nosso circuito então fica assim:
Você pode conferir a disposição dos pinos da Raspberry Pi Pico na imagem abaixo (clique para ampliar):
Com o circuito montado, vamos à programação.
Instalação do Micropython na Raspberry Pi Pico
A nossa programação para controle do LCD 16×2 I2C será feita em Python, e para usar essa linguagem na Pico vamos primeiro habilitar o MicroPython na placa com alguns passos bem simples:
1 – Faça o download do MicroPython para a Raspberry Pi Pico neste link
2 – Para transferir o arquivo que você baixou para a Pico, desconecte o cabo USB da sua placa, pressione o botão BOOTSEL da placa e em seguida conecte o cabo USB na placa e no computador
3 – Mantenha o botão BOOTSEL pressionado até que uma unidade (drive) chamada RPI-RP2 apareça no seu computador
4 – Arraste o arquivo do MicroPython que você baixou até a unidade RPI-RP2
5 – Logo após a transferência a placa será reiniciada e já estará “rodando” o MicroPython
A instalação do MicroPython é bem simples. Feito isso, já podemos começar a transferir os nossos programas para a placa.
Transferindo programas em Python usando Thonny
A IDE que vamos usar para transferir os arquivos em Python para a Raspberry Pi Pico é a Thonny, disponível para download aqui.
Se você estiver usando Windows, baixe o executável e faça a instalação normalmente. Se for usar Linux na Raspberry Pi, por exemplo, use o comando abaixo para instalar o Thonny:
sudo apt install thonny
Feita a instalação, carregue o Thonny, que deve apresentar esta tela inicial:
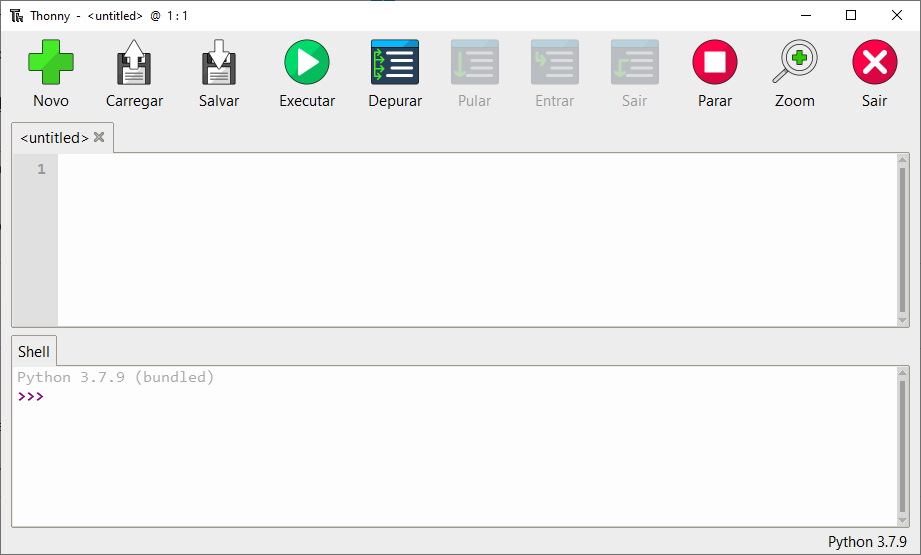
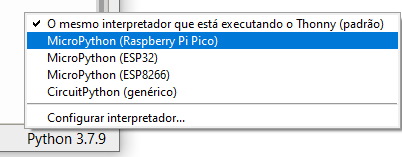
A primeira coisa que vamos fazer é alterar o interpretador Python que o Thonny está usando. Por padrão, ele roda os programas em python dentro do próprio Thonny, mas queremos que ele execute os programas direto na nossa placa.
Para isso, no canto inferior direito, onde está escrito Python 3.7.9, selecione MicroPython (Raspberry Pi Pico):
O que precisamos fazer agora é transferir os programas necessários para o funcionamento do display usando a interface do Thonny. São 3 programas, sendo os 2 primeiros as “bibliotecas” e por último o programa principal.
Na IDE, use a parte superior e coloque o código abaixo:
import time

class LcdApi:

    LCD_CLR = 0x01              # DB0: clear display
    LCD_HOME = 0x02             # DB1: return to home position

    LCD_ENTRY_MODE = 0x04       # DB2: set entry mode
    LCD_ENTRY_INC = 0x02        # --DB1: increment
    LCD_ENTRY_SHIFT = 0x01      # --DB0: shift

    LCD_ON_CTRL = 0x08          # DB3: turn lcd/cursor on
    LCD_ON_DISPLAY = 0x04       # --DB2: turn display on
    LCD_ON_CURSOR = 0x02        # --DB1: turn cursor on
    LCD_ON_BLINK = 0x01         # --DB0: blinking cursor

    LCD_MOVE = 0x10             # DB4: move cursor/display
    LCD_MOVE_DISP = 0x08        # --DB3: move display (0-> move cursor)
    LCD_MOVE_RIGHT = 0x04       # --DB2: move right (0-> left)

    LCD_FUNCTION = 0x20         # DB5: function set
    LCD_FUNCTION_8BIT = 0x10    # --DB4: set 8BIT mode (0->4BIT mode)
    LCD_FUNCTION_2LINES = 0x08  # --DB3: two lines (0->one line)
    LCD_FUNCTION_10DOTS = 0x04  # --DB2: 5x10 font (0->5x7 font)
    LCD_FUNCTION_RESET = 0x30   # See "Initializing by Instruction" section

    LCD_CGRAM = 0x40            # DB6: set CG RAM address
    LCD_DDRAM = 0x80            # DB7: set DD RAM address

    LCD_RS_CMD = 0
    LCD_RS_DATA = 1

    LCD_RW_WRITE = 0
    LCD_RW_READ = 1

    def __init__(self, num_lines, num_columns):
        self.num_lines = num_lines
        if self.num_lines > 4:
            self.num_lines = 4
        self.num_columns = num_columns
        if self.num_columns > 40:
            self.num_columns = 40
        self.cursor_x = 0
        self.cursor_y = 0
        self.implied_newline = False
        self.backlight = True
        self.display_off()
        self.backlight_on()
        self.clear()
        self.hal_write_command(self.LCD_ENTRY_MODE | self.LCD_ENTRY_INC)
        self.hide_cursor()
        self.display_on()

    def clear(self):
        """Clears the LCD display and moves the cursor to the top left
        corner.
        """
        self.hal_write_command(self.LCD_CLR)
        self.hal_write_command(self.LCD_HOME)
        self.cursor_x = 0
        self.cursor_y = 0

    def show_cursor(self):
        """Causes the cursor to be made visible."""
        self.hal_write_command(self.LCD_ON_CTRL | self.LCD_ON_DISPLAY |
                               self.LCD_ON_CURSOR)

    def hide_cursor(self):
        """Causes the cursor to be hidden."""
        self.hal_write_command(self.LCD_ON_CTRL | self.LCD_ON_DISPLAY)

    def blink_cursor_on(self):
        """Turns on the cursor, and makes it blink."""
        self.hal_write_command(self.LCD_ON_CTRL | self.LCD_ON_DISPLAY |
                               self.LCD_ON_CURSOR | self.LCD_ON_BLINK)

    def blink_cursor_off(self):
        """Turns on the cursor, and makes it no blink (i.e. be solid)."""
        self.hal_write_command(self.LCD_ON_CTRL | self.LCD_ON_DISPLAY |
                               self.LCD_ON_CURSOR)

    def display_on(self):
        """Turns on (i.e. unblanks) the LCD."""
        self.hal_write_command(self.LCD_ON_CTRL | self.LCD_ON_DISPLAY)

    def display_off(self):
        """Turns off (i.e. blanks) the LCD."""
        self.hal_write_command(self.LCD_ON_CTRL)

    def backlight_on(self):
        """Turns the backlight on.
        This isn't really an LCD command, but some modules have backlight
        controls, so this allows the hal to pass through the command.
        """
        self.backlight = True
        self.hal_backlight_on()

    def backlight_off(self):
        """Turns the backlight off.
        This isn't really an LCD command, but some modules have backlight
        controls, so this allows the hal to pass through the command.
        """
        self.backlight = False
        self.hal_backlight_off()

    def move_to(self, cursor_x, cursor_y):
        """Moves the cursor position to the indicated position. The cursor
        position is zero based (i.e. cursor_x == 0 indicates first column).
        """
        self.cursor_x = cursor_x
        self.cursor_y = cursor_y
        addr = cursor_x & 0x3f
        if cursor_y & 1:
            addr += 0x40    # Lines 1 & 3 add 0x40
        if cursor_y & 2:    # Lines 2 & 3 add number of columns
            addr += self.num_columns
        self.hal_write_command(self.LCD_DDRAM | addr)

    def putchar(self, char):
        """Writes the indicated character to the LCD at the current cursor
        position, and advances the cursor by one position.
        """
        if char == '\n':
            if self.implied_newline:
                # self.implied_newline means we advanced due to a wraparound,
                # so if we get a newline right after that we ignore it.
                pass
            else:
                self.cursor_x = self.num_columns
        else:
            self.hal_write_data(ord(char))
            self.cursor_x += 1
        if self.cursor_x >= self.num_columns:
            self.cursor_x = 0
            self.cursor_y += 1
            self.implied_newline = (char != '\n')
        if self.cursor_y >= self.num_lines:
            self.cursor_y = 0
        self.move_to(self.cursor_x, self.cursor_y)

    def putstr(self, string):
        """Write the indicated string to the LCD at the current cursor
        position and advances the cursor position appropriately.
        """
        for char in string:
            self.putchar(char)

    def custom_char(self, location, charmap):
        """Write a character to one of the 8 CGRAM locations, available
        as chr(0) through chr(7).
        """
        location &= 0x7
        self.hal_write_command(self.LCD_CGRAM | (location << 3))
        self.hal_sleep_us(40)
        for i in range(8):
            self.hal_write_data(charmap[i])
            self.hal_sleep_us(40)
        self.move_to(self.cursor_x, self.cursor_y)

    def hal_backlight_on(self):
        """Allows the hal layer to turn the backlight on.
        If desired, a derived HAL class will implement this function.
        """
        pass

    def hal_backlight_off(self):
        """Allows the hal layer to turn the backlight off.
        If desired, a derived HAL class will implement this function.
        """
        pass

    def hal_write_command(self, cmd):
        """Write a command to the LCD.
        It is expected that a derived HAL class will implement this
        function.
        """
        raise NotImplementedError

    def hal_write_data(self, data):
        """Write data to the LCD.
        It is expected that a derived HAL class will implement this
        function.
        """
        raise NotImplementedError

    def hal_sleep_us(self, usecs):
        """Sleep for some time (given in microseconds)."""
        time.sleep_us(usecs)
Salve o programa na Raspberry Pi Pico usando o botão SALVAR da interface (o 3o. botão na parte de cima). Salve este programa com o nome de lcd_api.py.
Faça a mesma coisa com o segundo código, salvando como pico_i2c_lcd.py:
import time

class LcdApi:

    LCD_CLR = 0x01              # DB0: clear display
    LCD_HOME = 0x02             # DB1: return to home position

    LCD_ENTRY_MODE = 0x04       # DB2: set entry mode
    LCD_ENTRY_INC = 0x02        # --DB1: increment
    LCD_ENTRY_SHIFT = 0x01      # --DB0: shift

    LCD_ON_CTRL = 0x08          # DB3: turn lcd/cursor on
    LCD_ON_DISPLAY = 0x04       # --DB2: turn display on
    LCD_ON_CURSOR = 0x02        # --DB1: turn cursor on
    LCD_ON_BLINK = 0x01         # --DB0: blinking cursor

    LCD_MOVE = 0x10             # DB4: move cursor/display
    LCD_MOVE_DISP = 0x08        # --DB3: move display (0-> move cursor)
    LCD_MOVE_RIGHT = 0x04       # --DB2: move right (0-> left)

    LCD_FUNCTION = 0x20         # DB5: function set
    LCD_FUNCTION_8BIT = 0x10    # --DB4: set 8BIT mode (0->4BIT mode)
    LCD_FUNCTION_2LINES = 0x08  # --DB3: two lines (0->one line)
    LCD_FUNCTION_10DOTS = 0x04  # --DB2: 5x10 font (0->5x7 font)
    LCD_FUNCTION_RESET = 0x30   # See "Initializing by Instruction" section

    LCD_CGRAM = 0x40            # DB6: set CG RAM address
    LCD_DDRAM = 0x80            # DB7: set DD RAM address

    LCD_RS_CMD = 0
    LCD_RS_DATA = 1

    LCD_RW_WRITE = 0
    LCD_RW_READ = 1

    def __init__(self, num_lines, num_columns):
        self.num_lines = num_lines
        if self.num_lines > 4:
            self.num_lines = 4
        self.num_columns = num_columns
        if self.num_columns > 40:
            self.num_columns = 40
        self.cursor_x = 0
        self.cursor_y = 0
        self.implied_newline = False
        self.backlight = True
        self.display_off()
        self.backlight_on()
        self.clear()
        self.hal_write_command(self.LCD_ENTRY_MODE | self.LCD_ENTRY_INC)
        self.hide_cursor()
        self.display_on()

    def clear(self):
        """Clears the LCD display and moves the cursor to the top left
        corner.
        """
        self.hal_write_command(self.LCD_CLR)
        self.hal_write_command(self.LCD_HOME)
        self.cursor_x = 0
        self.cursor_y = 0

    def show_cursor(self):
        """Causes the cursor to be made visible."""
        self.hal_write_command(self.LCD_ON_CTRL | self.LCD_ON_DISPLAY |
                               self.LCD_ON_CURSOR)

    def hide_cursor(self):
        """Causes the cursor to be hidden."""
        self.hal_write_command(self.LCD_ON_CTRL | self.LCD_ON_DISPLAY)

    def blink_cursor_on(self):
        """Turns on the cursor, and makes it blink."""
        self.hal_write_command(self.LCD_ON_CTRL | self.LCD_ON_DISPLAY |
                               self.LCD_ON_CURSOR | self.LCD_ON_BLINK)

    def blink_cursor_off(self):
        """Turns on the cursor, and makes it no blink (i.e. be solid)."""
        self.hal_write_command(self.LCD_ON_CTRL | self.LCD_ON_DISPLAY |
                               self.LCD_ON_CURSOR)

    def display_on(self):
        """Turns on (i.e. unblanks) the LCD."""
        self.hal_write_command(self.LCD_ON_CTRL | self.LCD_ON_DISPLAY)

    def display_off(self):
        """Turns off (i.e. blanks) the LCD."""
        self.hal_write_command(self.LCD_ON_CTRL)

    def backlight_on(self):
        """Turns the backlight on.
        This isn't really an LCD command, but some modules have backlight
        controls, so this allows the hal to pass through the command.
        """
        self.backlight = True
        self.hal_backlight_on()

    def backlight_off(self):
        """Turns the backlight off.
        This isn't really an LCD command, but some modules have backlight
        controls, so this allows the hal to pass through the command.
        """
        self.backlight = False
        self.hal_backlight_off()

    def move_to(self, cursor_x, cursor_y):
        """Moves the cursor position to the indicated position. The cursor
        position is zero based (i.e. cursor_x == 0 indicates first column).
        """
        self.cursor_x = cursor_x
        self.cursor_y = cursor_y
        addr = cursor_x & 0x3f
        if cursor_y & 1:
            addr += 0x40    # Lines 1 & 3 add 0x40
        if cursor_y & 2:    # Lines 2 & 3 add number of columns
            addr += self.num_columns
        self.hal_write_command(self.LCD_DDRAM | addr)

    def putchar(self, char):
        """Writes the indicated character to the LCD at the current cursor
        position, and advances the cursor by one position.
        """
        if char == '\n':
            if self.implied_newline:
                # self.implied_newline means we advanced due to a wraparound,
                # so if we get a newline right after that we ignore it.
                pass
            else:
                self.cursor_x = self.num_columns
        else:
            self.hal_write_data(ord(char))
            self.cursor_x += 1
        if self.cursor_x >= self.num_columns:
            self.cursor_x = 0
            self.cursor_y += 1
            self.implied_newline = (char != '\n')
        if self.cursor_y >= self.num_lines:
            self.cursor_y = 0
        self.move_to(self.cursor_x, self.cursor_y)

    def putstr(self, string):
        """Write the indicated string to the LCD at the current cursor
        position and advances the cursor position appropriately.
        """
        for char in string:
            self.putchar(char)

    def custom_char(self, location, charmap):
        """Write a character to one of the 8 CGRAM locations, available
        as chr(0) through chr(7).
        """
        location &= 0x7
        self.hal_write_command(self.LCD_CGRAM | (location << 3))
        self.hal_sleep_us(40)
        for i in range(8):
            self.hal_write_data(charmap[i])
            self.hal_sleep_us(40)
        self.move_to(self.cursor_x, self.cursor_y)

    def hal_backlight_on(self):
        """Allows the hal layer to turn the backlight on.
        If desired, a derived HAL class will implement this function.
        """
        pass

    def hal_backlight_off(self):
        """Allows the hal layer to turn the backlight off.
        If desired, a derived HAL class will implement this function.
        """
        pass

    def hal_write_command(self, cmd):
        """Write a command to the LCD.
        It is expected that a derived HAL class will implement this
        function.
        """
        raise NotImplementedError

    def hal_write_data(self, data):
        """Write data to the LCD.
        It is expected that a derived HAL class will implement this
        function.
        """
        raise NotImplementedError

    def hal_sleep_us(self, usecs):
        """Sleep for some time (given in microseconds)."""
        time.sleep_us(usecs)
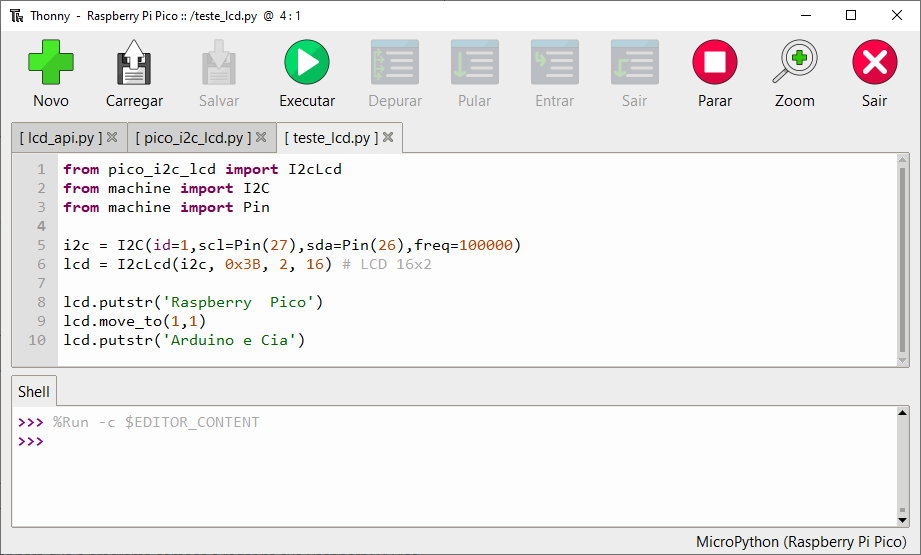
Por último, o programa principal, que vai chamar os dois anteriores:
from pico_i2c_lcd import I2cLcd
from machine import I2C
from machine import Pin

i2c = I2C(id=1,scl=Pin(27),sda=Pin(26),freq=100000)
lcd = I2cLcd(i2c, 0x3B, 2, 16) # LCD 16x2

lcd.putstr('Raspberry  Pico')
lcd.move_to(1,1)
lcd.putstr('Arduino e Cia')
Salve este arquivo com o nome de teste_lcd.py. Sua tela deve ficar assim:
Com o programa teste_lcd.py na tela, selecione o botão Executar para que o programa comece a rodar na sua Raspberry Pi Pico.
Se for apresentada uma mensagem de erro, provavelmente é algum problema no endereçamento do seu display I2C. Estou usando um display com o endereço 0x3B, mas você pode ter algum outro endereço configurado.
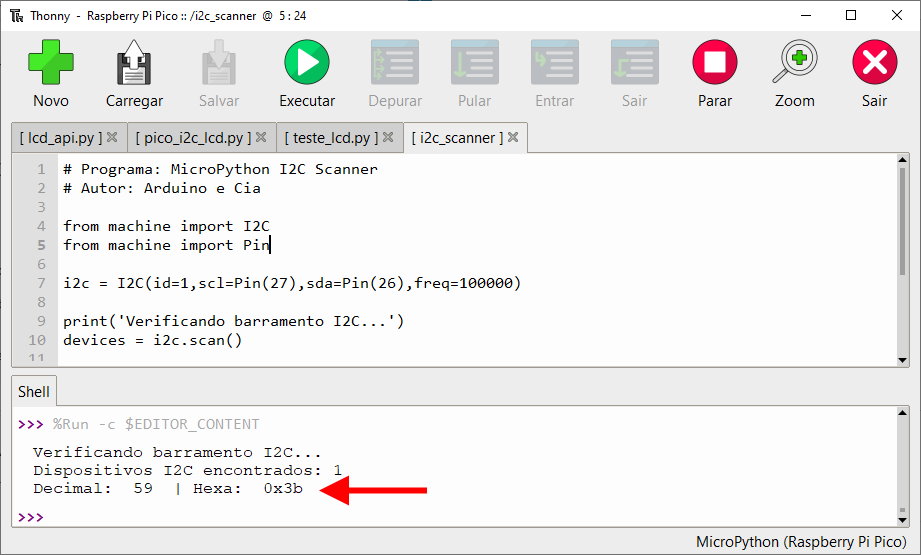
Para descobrir o endereço do seu display I2C, use o programa abaixo:
# Programa: MicroPython I2C Scanner
# Autor: Arduino e Cia

from machine import I2C
from machine import Pin

i2c = I2C(id=1,scl=Pin(27),sda=Pin(26),freq=100000)

print('Verificando barramento I2C...')
devices = i2c.scan()

if len(devices) == 0:
  print("Nao foram detectados dispositivos I2C!")
else:
  print('Dispositivos I2C encontrados:',len(devices))

  for device in devices:
    print("Decimal: ",device," | Hexa: ",hex(device))
Ao executar o programa, ele mostra na parte inferior do Thonny os dispositivos I2C detectados:
Você pode usar o I2C Scanner para detectar outros dispositivos, como acelerômetros, relógios de tempo real (RTC), GPS, etc.
Gostou? Confira outros posts usando Raspberry Pi Pico aqui mesmo no Arduino e Cia!
Excelente projeto! Pretendo realizar
Valeu Geraldo! 🙂
Abraço.
Adilson
Tem apenas uns erros no código, no arquivo pico_i2c_lcd, falta colocar “from lcd_api import LcdApi”, e mudar a classe para class I2cLcd(LcdApi):
Oi Luiz,
Obrigado pela mensagem. Aqui eu não precisei fazer isso, mas fica de sugestão se alguém tiver problemas.
Abraço!
Adilson
Tem como demonstrar usando a IDE do arduino?